ROS+rosjava+android+studio

開発環境の整え

関連ツール、コンポーネントの互換性から予測せぬ、さまざまなコンパイルエラーに苦労してきた。強力なROS機能が込められたandroid app開発環境の整備を目指して、Ubuntu14.04.5(Trusty)の環境で、ROS Indigo→rosjava→android studio→android_coreの順番でインストールしていきましょう。

Ubuntu 14.04.5(Trusty)

ROS Indigoの公式に認定した動作OSなので、インストールしておくこと。

ROS Indigo

android向けでは、ROS Indigoの都合がよく、インストールしておくこと。

$sudo sh -c 'echo "deb http://packages.ros.org/ros/ubuntu trusty main" > /etc/apt/sources.list.d/ros-latest.list'
$wget http://packages.ros.org/ros.key -O - | sudo apt-key add -
$sudo apt-get update
$sudo apt-get install ros-indigo-desktop-full
$sudo rosdep init
$rosdep update
$source /opt/ros/indigo/setup.bash
$sudo apt-get install python-rosinstall
$mkdir -p ~/catkin_ws/src
$cd ~/catkin_ws
$catkin_make

rosjava

ROSのjava版で、java言語でもROS全ての機能を操るまたカスタマイズできることになるのでインストールしておくこと。

$sudo add-apt-repository ppa:openjdk-r/ppa
$sudo apt-get update
$sudo apt-get install openjdk-8-jdk
$export JAVA_HOME=/usr/lib/jvm/java-8-openjdk-amd64
$mkdir -p ~/rosjava/src
$wstool init -j4 ~/rosjava/src https://raw.githubusercontent.com/rosjava/rosjava/indigo/rosjava.rosinstall
$source /opt/ros/indigo/setup.bash
$cd ~/rosjava
$rosdep update
$rosdep install --from-paths src -i -y
$catkin_make
$mkdir -p ~/myjava/src
$cd ~/myjava/src
$wstool init -j4 https://raw.githubusercontent.com/me/rosinstalls/master/my_custom_msg_repos.rosinstall
$source ~/rosjava/devel/setup.bash
$cd ~/myjava
$rosdep update
$rosdep install --from-paths src -i -y
$catkin_make

android studio

android studio 171.4443003~zesty 3.01 linux versionをインストールしておくこと。

$mkdir ~/android
$cd ~/android
$wget https://dl.google.com/dl/android/studio/ide-zips/3.0.1.0/android-studio-ide-171.4443003-linux.zip
$unzip android-studio-ide-171.4443003-linux.zip
$mv android-studio studio
$sudo dpkg --add-architecture i386
$sudo apt-get update -y
$sudo apt-get install -y libncurses5:i386 libstdc++6:i386 zlib1g:i386
$echo export PATH=$PATH:~/android/sdk/tools:~/android/sdk/platform-tools:~/android/studio/bin >> ~/.bashrc
$echo export ANDROID_HOME=~/android/sdk >> ~/.bashrc
$source ~/.bashrc
$studio.sh

android_core

android app開発向けのcore moduleが含まれているので、インストールしておくこと。

$mkdir -p ~/android_core/src
$wstool init ~/android_core/src https://raw.github.com/rosjava/rosjava/indigo/android_core.rosinstall
$cd ~/android_core
$catkin_make

関連記事

研究開発用 台車型ロボット キット

以上

3+

ロボット・ドローン部品お探しなら
ROBOT翔・電子部品ストア

windows10/ubuntu14.04デュアルブート

経緯

Lenovo L560にすでにwindows7 32bitがインストール済み、CPUのi5 6300Uが省エネ優先なので、バーチャル環境を辞めて、敢えてubuntu14.04とデュアルブートしようとした。

試行錯誤

USBでブート可能なubuntu14.04 64bitをインストールできなく、CDROMに変えて現象同様、USBでもCDでもブートすらできない状態に陥った。windows7 32bitが入っており、もしかしたらPCが32bitしかサポートできないか、先に、windows7 32bitをwindows 10 64bit proにアップグレートして成功した。次に、またUSBでubuntu14.04 64bitインストール失敗、windows7 32bitとの現象とは同様、というのは別の問題が抱えていた。BiosでSecurity BootをDisabeにして、Boot modeをUEFI Firstにして、CDROMでubuntu14.04 64bitがブート成功した。これでubuntu14.04 64bitがインストールできた。

いくつかの注意点

・windows 10にてdisk managementを起動して、NFTSパーティションを縮小して、フリーパーティション用意しておく。
・Ubuntu 14.04 64bit のインストールに、Install type をsomthing elseにして、windows 10で用意したフリーパーティションを使用する。
・フリーパーティションをext4 formatで/パーティション 、/homeパーティションを作り、またswap areaを10GB程度作る。
・/パーティションにubuntuのブートエリアにして、インストールを開始する。
・これまでデュアルブートの環境がほぼ用意できた。

Bootメニューの表示

このままだと、ブートメニューが表示せず、困るので、EasyBCD v2.4をwindows 10側にインストールして、ubuntuブートを新規追加して、
ブートメニューが出た。またUbuntu側で、grub設定を編集したことで、GRUBが開かれた際の初期カーソル位置がWindowsになるように設定できる。

#nano /etc/default/grub
GRUB_DEFAULT="Windows10 pro"
GRUB_TIMEOUT=30
#update-grub
#reboot

またもや問題点

L560のubuntu14.04が立ち上がったら、ethernet、wifiとも使えなく、ifconfigでもNICを認識できない症状ある。

$lspci | grep "Ethernet\|Network"
00:1f.6 Ethernet controller: Intel Corporation Ethernet Connection 156f (rev 21)
02:00.0 Network controller: Intel Corporation Wireless 8260 (rev 3a)

https://downloadcenter.intel.com/download/15817 からe1000e-3.4.2.1.tar.gzをダウンロードする。
https://cateee.net/lkddb/web-lkddb/NET_VENDOR_INTEL.html からはe1000e シリーズでいけるかと知った。
他のマシンでダウンロードし、ubuntu-PCにUSBメモリなどでコピーして、srcディレクトリに移動して次のコマンドを実行する。

$sudo make install
$sudo modprobe -r e1000e
$sudo modprobe e1000e
$lsmod | grep e1000e

これでEhernetが接続できるようになる。

$sudo apt-get update
$sudo apt-get upgrade
$lspci | grep Nework
02:00.0 Network controller: Intel corporation Wireless 8260(rev 3a)
$uname-r
3.13.0-24-generic

kernalバージョンは3.13.0-24-generic、Intel 8260がkernal 4.2以上では利用可能なので、wifiはとりあえず放っておき、Ethernetだけでやっていくことにした。
追記:以下を実行することでwifiが使えるようになった。

$sudo modprobe iwlwifi

以上

3+

ロボット・ドローン部品お探しなら
ROBOT翔・電子部品ストア

Unity3DでTCPパケットを扱う

ソースコードは、githubへ公開ずみ。

関連記事は→ こちら

以上。

0

ロボット・ドローン部品お探しなら
ROBOT翔・電子部品ストア

Unity3DでUDPパケットを扱う

ソースコードは、githubへ公開ずみ。

関連記事は→ こちら

以上。

0

ロボット・ドローン部品お探しなら
ROBOT翔・電子部品ストア

Android AppにGPS機能実装の例

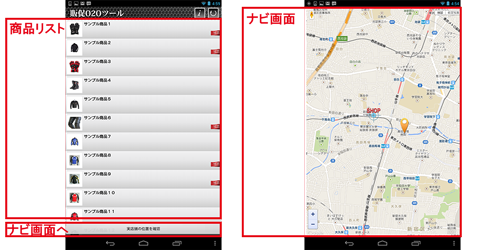
画面遷移

o2o-app
o2o-app

画面遷移するためのソースサンプル

1、遷移元画面 Listview.java

import com.soarcloud.O2O.Browser;
findButton.setOnClickListener(new View.OnClickListener() {  
  public void onClick(View v) { 
    Intent in = new Intent(getApplicationContext(), Browser.class);
    startActivity(in);	
  }  
});

2、遷移先のブラウザ画面 Brower.jaza

public class Browser extends Activity implements LocationListener {
	private WebView webView;// Create WebView object
	private Location mostRecentLocation;// Create Location object
	private LocationManager locationManager;// Create LocationManager object
	
   /** Called when the activity is first created. */
   @Override
   public void onCreate(Bundle savedInstanceState) {
      super.onCreate(savedInstanceState);
      setContentView(R.layout.browser);
      getLocation();// Get the current geocoordinates
      openBrowser();// Open a browser with the Google MapView  
   } // end main activity method
   
   /** Called when Activity Resumes **/
   protected void onResume() {
	   super.onResume();
	   getLocation();
   } // end onResume method
   
   /** Called when Activity is Paused **/
   protected void onPause() {
	   super.onPause();
	   locationManager.removeUpdates(this);
   } // end onPause method
   
   /** Create webView and JavaScript Interface **/
   private void openBrowser(){
	  // Create webView and assign to web_view item
 	  webView = (WebView) findViewById(R.id.web_view);
 	  // JavaScript is off by default, enabling JavaScript
 	  webView.getSettings().setJavaScriptEnabled(true);
 	  // Enable zoom controls if supported by hardware
 	  webView.getSettings().setBuiltInZoomControls(true);
 	  // Create and set WebViewClient subclass for rendering
 	  webView.setWebViewClient(new WebViewClient());		
 	  // Add Java to JavaScript Interface and call it 'android' for access.
 	  webView.addJavascriptInterface(new JavaScriptInterface(), "android");
 	  // Wait for the page to load then send the location information
 	  webView.setWebViewClient(new WebViewClient()); 
 	  // Load map.html page with webView
 	  webView.loadUrl(getURL());							
   } // end Browser method
   
   // Method to set/return URL for map page source
   private String getURL() {
      final String url = "file:///android_asset/map.html";
	  return url;
	} // end getURL method

   /** Retrieve current coordinates from GPS
    *  To save battery on the device the location update time has been increased. **/
   private void getLocation() {
	    // Android GPS Manager
	     locationManager =
	      (LocationManager)getSystemService(Context.LOCATION_SERVICE);
	    // Application criteria for selection location provider
	    Criteria criteria = new Criteria();	
	    // Set the accuracy requirement
	    criteria.setAccuracy(Criteria.ACCURACY_FINE);
	    // Get location data from best source
	    String provider = locationManager.getBestProvider(criteria,true);
	    // Get updates of current location
	    locationManager.requestLocationUpdates(provider, 2000, 1, this);
	    // Pass location data mostRecentLocation for JavaScript Interface
	    mostRecentLocation = locationManager.getLastKnownLocation(provider);
   } // end getLocation method
   /** Required methods when using LocationListener 
    *  Referenced from Android API		**/ 
   @Override
   public void onProviderDisabled(String provider) {
   }
   @Override
   public void onProviderEnabled(String provider) {
   }
   @Override
   public void onStatusChanged(String provider, int status, Bundle extras) {
   }
   @Override
   public void onLocationChanged(Location location) {
	   mostRecentLocation = location;
   }
   /** End required methods when using LocationListener **/   
} // End Browser.class Activity

3、AndroidManifest.xmlにBrowser画面を追加

<activity android:name="com.soarcloud.O2O.Browser" android:screenOrientation="portrait" />

4、Google地図を表示するmap.htmlを追加

<!DOCTYPE html>
<html>
<head>
<meta name="viewport" content="width=device-width, initial-scale=1.0, user-scalable=no" />
<meta http-equiv="content-type" content="text/html; charset=UTF-8"/>
<title>Google Map</title>
<script type="text/javascript" src="http://maps.google.com/maps/api/js?sensor=false"></script>
<script type="text/javascript">
function initialize() {
	var myOptions = {
		zoom: 17,
		mapTypeId: google.maps.MapTypeId.HYBRID
	}
	var map = new google.maps.Map(document.getElementById("map_canvas"), myOptions);
	var position_options = {
		enableHighAccuracy: false
	};
	navigator.geolocation.watchPosition(function(position) {
		var myLatlng = new google.maps.LatLng(position.coords.latitude, position.coords.longitude);
		map.setCenter(myLatlng);
		var marker = new google.maps.Marker({
			position: myLatlng,
			map: map
		});
	}, null, position_options);
}
</script>
<style type="text/css">
html, body {
	height: 100%;
	margin: 0;
	padding: 0;
	}
#map_canvas {
	height: 100%;
	}
</style>
</head>
<body onload="initialize()">
<div id="map_canvas"></div>
</body>
</html>
0

ロボット・ドローン部品お探しなら
ROBOT翔・電子部品ストア