CentOS6.3マルチドメイン、バーチャルホスト追加時、awstatsの設定

マルチドメイン、バーチャルホストを利用の際、ログファイルをドメイン、バーチャルホスト毎に分けて保存する場合の追加設定です。

1、apacheのhttpd.confファイルを編集し、ログにバーチャルホスト名を記載するようにします。

# nano /etc/httpd/conf/httpd.conf
LogFormat "%v %h %l %u %t "%r" %>s %b "%{Referer}i" "%{User-Agent}i"" combined #でvirtualhost名を指定

※初めて、awstats利用の場合、先にyum install awstatsを実行の必要があります。

2、/etc/awstats/の下に、ドメイン、バーチャルホスト毎にawstatsの設定ファイルを作成して、編集しておきます。

LogFormat = "%virtualname %host %other %logname %time1 %methodurl %code %bytesd %refererquot %uaquot" #vitualnameの指定が必要
DNSLookup=1 #訪問者のドメイン名を表示


3、/etc/httpd/conf.d/vhost.confを開いて、ドメイン、バーチャルホスト毎にログファイルの保存場所を指定しておきます。これでログは指定ファイルへ書き込まれるはずです。

ErrorLog "/var/log/httpd/ドメイン_error_log"
CustomLog "/var/log/httpd/ドメイン_access_log" combined

4、httpを再起動します。

# service httpd restart

5、 crontab を実行して、6時間毎に解析取得するようにドメイン、バーチャルホスト毎に設定しておきます。

# crontab -e
00 0-23/6 * * * /usr/bin/perl /usr/share/awstats/wwwroot/cgi-bin/awstats.pl -config=ドメイン > /dev/null

6、ブラウザから[http://サーバーIPアドレス/awstats/awstats.pl?config=ドメイン名=]でアクセスするとawstatsの解析結果が表示されます。

http://ドメイン/awstats/awstats.pl?config=ドメイン
0

ロボット・ドローン部品お探しなら
ROBOT翔・電子部品ストア

WordPress Popular PostsとBasic認証の兼ね合い

人気の記事を表示させるプラグインWordPress Popular Postsが有効にしたら、wp-adminのBasic認証画面が出てきます。これは、WordPress Popular Postsの設定→TOOLS→Ajaxify widgetがEnabledにして、wp-admin/admin-ajax.phpがJavacriptからアクセスしていると考えられます。wp-admin/.htaccessを以下内容を追加して、admin-ajax.phpへのアクセスを許可しておきます。

<Files ~ "^admin\-ajax\.php$">
    Satisfy Any
    allow from all
</Files>
0

ロボット・ドローン部品お探しなら
ROBOT翔・電子部品ストア

CocoaAsyncSocket使用のTCPクライアントiOS App

GCDソケットを利用してTCPクライアントの構築を行う際、最も基本な設定をメモしておきます。

1、Githubより、CocoaAsyncSocketをダウンロードしておきます。

2、GCDAsyncSocket.h、GCDAsyncSocket.mをxcodeプロジェクトに取りこみます。

3、ターゲットviewcontollerにヘッダファイルをインポートして、宣言しておきます。

#import "GCDAsyncSocket.h"
@interface ViewController (){
 GCDAsyncSocket *asyncSocket;
}

4、ソケットを初期化して、接続を行います。

asyncSocket=[[GCDAsyncSocket alloc] initWithDelegate:self
delegateQueue:dispatch_get_main_queue()];
NSError *error = nil;
uint16_t portno = [[[self port] text] intValue];
if (![asyncSocket connectToHost:[ipaddress text] onPort:
portno error:&error]){...}
else{...}
}

5、ソケットからデータを取り込みます。

[asyncSocket readDataWithTimeout:-1.0 tag:0];

6、ソケットへデータを書きこみます。

[asyncSocket writeData:requestData withTimeout:-1 tag:0];

withTimeout:-1 は、ライムアウトなしと意味します。

7、ソケットイベントハンドラもいくつか取りこみます。

- (void)socket:(GCDAsyncSocket *)sock didConnectToHost:
(NSString *)host port:(UInt16)portno {...}
- (void)socket:(GCDAsyncSocket *)sock didWriteDataWithTag:
(long)tag {...}
- (void)socket:(GCDAsyncSocket *)sock didReadData:
(NSData *)data withTag:(long)tag{...}
- (void)socketDidDisconnect:(GCDAsyncSocket *)sock 
withError:(NSError *)err {...}

以上

0

ロボット・ドローン部品お探しなら
ROBOT翔・電子部品ストア

Android AppにGPS機能実装の例

画面遷移

o2o-app
o2o-app

画面遷移するためのソースサンプル

1、遷移元画面 Listview.java

import com.soarcloud.O2O.Browser;
findButton.setOnClickListener(new View.OnClickListener() {  
  public void onClick(View v) { 
    Intent in = new Intent(getApplicationContext(), Browser.class);
    startActivity(in);	
  }  
});

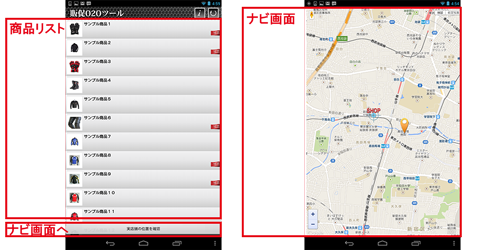
2、遷移先のブラウザ画面 Brower.jaza

public class Browser extends Activity implements LocationListener {
	private WebView webView;// Create WebView object
	private Location mostRecentLocation;// Create Location object
	private LocationManager locationManager;// Create LocationManager object
	
   /** Called when the activity is first created. */
   @Override
   public void onCreate(Bundle savedInstanceState) {
      super.onCreate(savedInstanceState);
      setContentView(R.layout.browser);
      getLocation();// Get the current geocoordinates
      openBrowser();// Open a browser with the Google MapView  
   } // end main activity method
   
   /** Called when Activity Resumes **/
   protected void onResume() {
	   super.onResume();
	   getLocation();
   } // end onResume method
   
   /** Called when Activity is Paused **/
   protected void onPause() {
	   super.onPause();
	   locationManager.removeUpdates(this);
   } // end onPause method
   
   /** Create webView and JavaScript Interface **/
   private void openBrowser(){
	  // Create webView and assign to web_view item
 	  webView = (WebView) findViewById(R.id.web_view);
 	  // JavaScript is off by default, enabling JavaScript
 	  webView.getSettings().setJavaScriptEnabled(true);
 	  // Enable zoom controls if supported by hardware
 	  webView.getSettings().setBuiltInZoomControls(true);
 	  // Create and set WebViewClient subclass for rendering
 	  webView.setWebViewClient(new WebViewClient());		
 	  // Add Java to JavaScript Interface and call it 'android' for access.
 	  webView.addJavascriptInterface(new JavaScriptInterface(), "android");
 	  // Wait for the page to load then send the location information
 	  webView.setWebViewClient(new WebViewClient()); 
 	  // Load map.html page with webView
 	  webView.loadUrl(getURL());							
   } // end Browser method
   
   // Method to set/return URL for map page source
   private String getURL() {
      final String url = "file:///android_asset/map.html";
	  return url;
	} // end getURL method

   /** Retrieve current coordinates from GPS
    *  To save battery on the device the location update time has been increased. **/
   private void getLocation() {
	    // Android GPS Manager
	     locationManager =
	      (LocationManager)getSystemService(Context.LOCATION_SERVICE);
	    // Application criteria for selection location provider
	    Criteria criteria = new Criteria();	
	    // Set the accuracy requirement
	    criteria.setAccuracy(Criteria.ACCURACY_FINE);
	    // Get location data from best source
	    String provider = locationManager.getBestProvider(criteria,true);
	    // Get updates of current location
	    locationManager.requestLocationUpdates(provider, 2000, 1, this);
	    // Pass location data mostRecentLocation for JavaScript Interface
	    mostRecentLocation = locationManager.getLastKnownLocation(provider);
   } // end getLocation method
   /** Required methods when using LocationListener 
    *  Referenced from Android API		**/ 
   @Override
   public void onProviderDisabled(String provider) {
   }
   @Override
   public void onProviderEnabled(String provider) {
   }
   @Override
   public void onStatusChanged(String provider, int status, Bundle extras) {
   }
   @Override
   public void onLocationChanged(Location location) {
	   mostRecentLocation = location;
   }
   /** End required methods when using LocationListener **/   
} // End Browser.class Activity

3、AndroidManifest.xmlにBrowser画面を追加

<activity android:name="com.soarcloud.O2O.Browser" android:screenOrientation="portrait" />

4、Google地図を表示するmap.htmlを追加

<!DOCTYPE html>
<html>
<head>
<meta name="viewport" content="width=device-width, initial-scale=1.0, user-scalable=no" />
<meta http-equiv="content-type" content="text/html; charset=UTF-8"/>
<title>Google Map</title>
<script type="text/javascript" src="http://maps.google.com/maps/api/js?sensor=false"></script>
<script type="text/javascript">
function initialize() {
	var myOptions = {
		zoom: 17,
		mapTypeId: google.maps.MapTypeId.HYBRID
	}
	var map = new google.maps.Map(document.getElementById("map_canvas"), myOptions);
	var position_options = {
		enableHighAccuracy: false
	};
	navigator.geolocation.watchPosition(function(position) {
		var myLatlng = new google.maps.LatLng(position.coords.latitude, position.coords.longitude);
		map.setCenter(myLatlng);
		var marker = new google.maps.Marker({
			position: myLatlng,
			map: map
		});
	}, null, position_options);
}
</script>
<style type="text/css">
html, body {
	height: 100%;
	margin: 0;
	padding: 0;
	}
#map_canvas {
	height: 100%;
	}
</style>
</head>
<body onload="initialize()">
<div id="map_canvas"></div>
</body>
</html>
0

ロボット・ドローン部品お探しなら
ROBOT翔・電子部品ストア

Fluentedを使ってセンサデータの収集、クラウドへ転送

サーバ側Fluented設定

## built-in TCP input
## $ echo <json> | fluent-cat <tag>
<source>
 type forward
 port 24224
</source>
<match sensor.test>
 type mongo
 database sensor
 collection test
 host localhost
 port 27017
 disable_collection_check true
 capped
 capped_size 2048m
</match>
<match gyro.test>
 type mongo
 database gyro
 collection test
 host localhost
 port 27017
 disable_collection_check true
 capped
 capped_size 2048m
</match>

センサデータ収集転送側Fluentd設定

coming soon

ロボット翔-電子部品ストアで、SLAM LIDARなどのロボット部品、ドローン、センサモジュールを販売しています。

0

ロボット・ドローン部品お探しなら
ROBOT翔・電子部品ストア