はじめに
Mask R-CNNとはICCV 2017 Best Paper に選出された手法で、物体検出Object Dectectionやセマンティック・セグメンテーションSemantic Segmentationを実現するための手法である。COCOデータセットにより学習した、Matterport Mask_RCNNモデルを利用して、デモ画像より物体検出、セグメンテーションデモをGoogle colabで動かしてみよう。
デモを動かそう
Matterport Mask_RCNN、COCO API・Datasetのインストール、デフォルトのデモを動かす手順の以下の通り。
・Mask_RCNNのインストール、セットアップ
%cd /content/drive/My Drive
!git clone https://github.com/matterport/Mask_RCNN.git
%cd ./Mask_RCNN
!pip install -r requirements.txt
%run -i setup.py install
・COCO APIのインストール、セットアップ
%cd ..
!git clone https://github.com/waleedka/coco.git
%cd ./coco/PythonAPI
%run -i setup.py build_ext --inplace
・COCO Datasetで学習したMask_RCNNモデルのインストール
import os
import sys
import random
import math
import numpy as np
import skimage.io
import matplotlib
import matplotlib.pyplot as plt

# Root directory of the project
ROOT_DIR = os.path.abspath("/content/drive/My Drive/Mask_RCNN")

<pre class="brush: actionscript3; gutter: false">
# Import Mask RCNN
sys.path.append(ROOT_DIR)  # To find local version of the library
from mrcnn import utils
import mrcnn.model as modellib
from mrcnn import visualize
# Import COCO config
sys.path.append(os.path.join(ROOT_DIR, "samples/coco/"))  # To find local version
import coco

%matplotlib inline

# Directory to save logs and trained model
MODEL_DIR = os.path.join(ROOT_DIR, "logs")

# Local path to trained weights file
COCO_MODEL_PATH = os.path.join(ROOT_DIR, "mask_rcnn_coco.h5")
# Download COCO trained weights from Releases if needed
if not os.path.exists(COCO_MODEL_PATH):
    utils.download_trained_weights(COCO_MODEL_PATH)

# Directory of images to run detection on
IMAGE_DIR = os.path.join(ROOT_DIR, "images")

class InferenceConfig(coco.CocoConfig):
    # Set batch size to 1 since we'll be running inference on
    # one image at a time. Batch size = GPU_COUNT * IMAGES_PER_GPU
    GPU_COUNT = 1
    IMAGES_PER_GPU = 1

config = InferenceConfig()
# config.display()
いよいよ認識しようと、以下のpythonコードを実行する。
# Create model object in inference mode.
model = modellib.MaskRCNN(mode="inference", model_dir=MODEL_DIR, config=config)

# Load weights trained on MS-COCO
model.load_weights(COCO_MODEL_PATH, by_name=True)

# COCO Class names
# Index of the class in the list is its ID. For example, to get ID of
# the teddy bear class, use: class_names.index('teddy bear')
class_names = ['BG', 'person', 'bicycle', 'car', 'motorcycle', 'airplane',
               'bus', 'train', 'truck', 'boat', 'traffic light',
               'fire hydrant', 'stop sign', 'parking meter', 'bench', 'bird',
               'cat', 'dog', 'horse', 'sheep', 'cow', 'elephant', 'bear',
               'zebra', 'giraffe', 'backpack', 'umbrella', 'handbag', 'tie',
               'suitcase', 'frisbee', 'skis', 'snowboard', 'sports ball',
               'kite', 'baseball bat', 'baseball glove', 'skateboard',
               'surfboard', 'tennis racket', 'bottle', 'wine glass', 'cup',
               'fork', 'knife', 'spoon', 'bowl', 'banana', 'apple',
               'sandwich', 'orange', 'broccoli', 'carrot', 'hot dog', 'pizza',
               'donut', 'cake', 'chair', 'couch', 'potted plant', 'bed',
               'dining table', 'toilet', 'tv', 'laptop', 'mouse', 'remote',
               'keyboard', 'cell phone', 'microwave', 'oven', 'toaster',
               'sink', 'refrigerator', 'book', 'clock', 'vase', 'scissors',
               'teddy bear', 'hair drier', 'toothbrush']
# Load a random image from the images folder
file_names = next(os.walk(IMAGE_DIR))[2]
for file_name in file_names:
  image = skimage.io.imread(os.path.join(IMAGE_DIR, file_name))

  # Run detection
  results = model.detect([image], verbose=1)

  # Visualize results
  r = results[0]
  visualize.display_instances(image, r['rois'], r['masks'], r['class_ids'],
                              class_names, r['scores'])
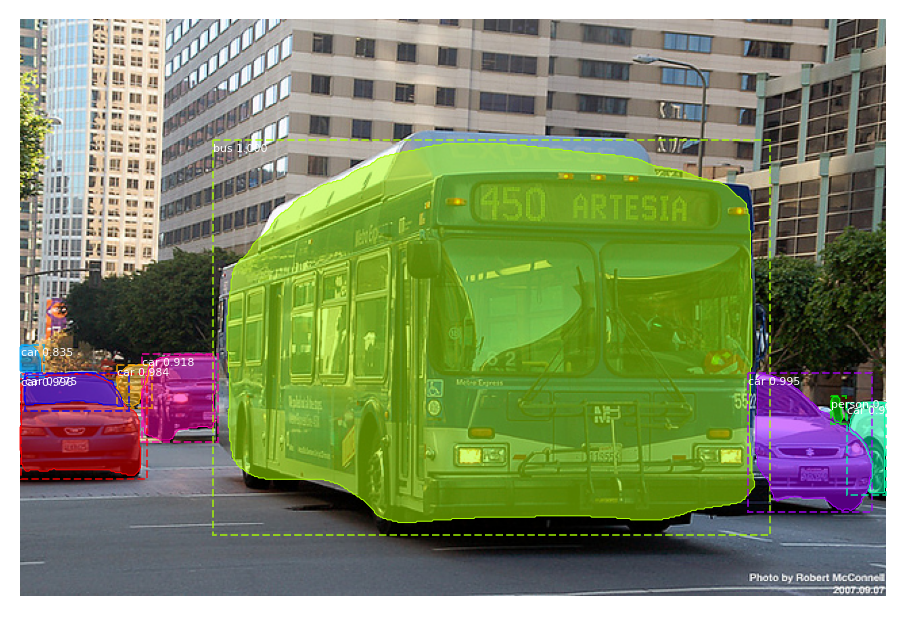
うまくいけばSemantic Segmentationでマスクしたデモ画像が表示される。
※ Mask_RCNNの利用は、以下のとおりtensorflowバージョンを1.xに、
%tensorflow_version 1.x
import tensorflow
print(tensorflow.__version__)
ランタイムのタイプをGPUに設定して再起動して、またもう1回tensorflowバージョンを1.xにして確認する。
%tensorflow_version 1.x
import tensorflow
print(tensorflow.__version__)
デモの画像を入れ替えてみよう
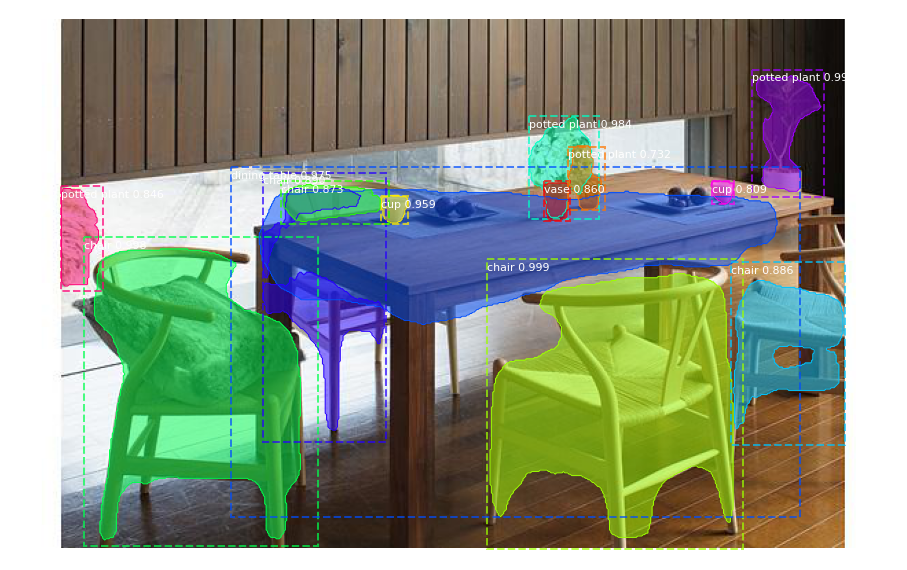
images直下のデモ画像を入れ替えて上記pythonコードを実行してたら、以下画像のようにDining tableの一部が未検出であった。
Notebook ipynbファイルがGithubへ公開済み。
感想
デモ画像がよさそうに検出できたように見えますが、入れ替えたらそうでもない結果となった。やはり検出の正確性が学習モデルに大いに相関することで、専用学習データで学習モデルを作成しないと納得いく結果が得られず。画像データアノテーションImage Data Annotation業務が請負可能な業者さんがドンドン増えているらしい。
参考文献
Matterport Mask_RCNN on Github.
以上
ロボット・ドローン部品お探しなら![]()